Enterprise to MPP Firmware Migration for Webex Calling
This service allows customers and partners to perform the migration of CUCM/HCS Enterprise Phones to MPP Phones by upgrading to the different firmware and to enable the calling service by applying the licenses. This page describes the migration procedures specifically for Webex Calling.
After successful migration, your phones will be converted to the MPP firmware version - 12-0-7MPP0301-92
Please note the software version of 8845/8865/8865NR will be 12-0-7MPP0201-66
Overview
Prepare your environment
Hardware version and models
Verify if the hardware version and models are eligible for the migration. Please see Firmware Migration(Overview) for more details.
Migration licenses
The licenses are required to enable the calling services after migrating the firmware.For Webex Calling, the licenses are generated via migration assistant tool in Cisco WebEx Control Hub, which
- automate phone migration license generation and delivery.
- auto-register your devices to Webex Calling.
Firewall/Proxy requirements
If you are using a firewall only, note that filtering traffic using IP addresses is not supported, as the IP addresses used by Cloud Upgrader are dynamic and may change at any time. If your firewall supports URL filtering, white list the following URLs:- cloudupgrader.webex.com, ports: 6970/443
- activate.cisco.com, ports: 443
- activation.webex.com, ports 443
- *.wbx2.com, ports 443
Please see Webex Calling Port Information for other ports and URLs/IP addresses that are required to successfully register your phones to Webex Calling.
Network requirements
- DNS
- Internet connectivity from Voice VLAN
- DHCP Options(depending on the migration method of your choice)
Methods
There are several methods to run the migration. We recommend 3 methods depending on your current deployment type:- Bulk migration with CUCM (CUCM-registered phones)
- Bulk migration with DHCP (Phones' staging facility)
- Manual migration (Lab/PoC/Several devices)
Run Migration
Introduction
Requirements
- The procedures in migration assistant tool have been completed.
- The model-grouped device text files have been downloaded from migration assistant tool. Refer to document.
- The phones that you intend to migrate, should be registered with CUCM over ethernet connection.
Steps
| Step 1 | Navigate to CUCM https://<IP or FQDN>/ccmadmin |
| Step 2 |
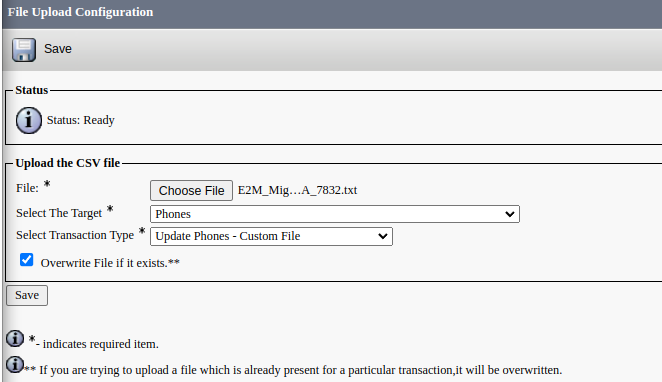
From Cisco Unified CM Administration, go to Bulk Administration -> Upload/Download Files, then click Add New to add the files one-by-one
|
| Step 3 |
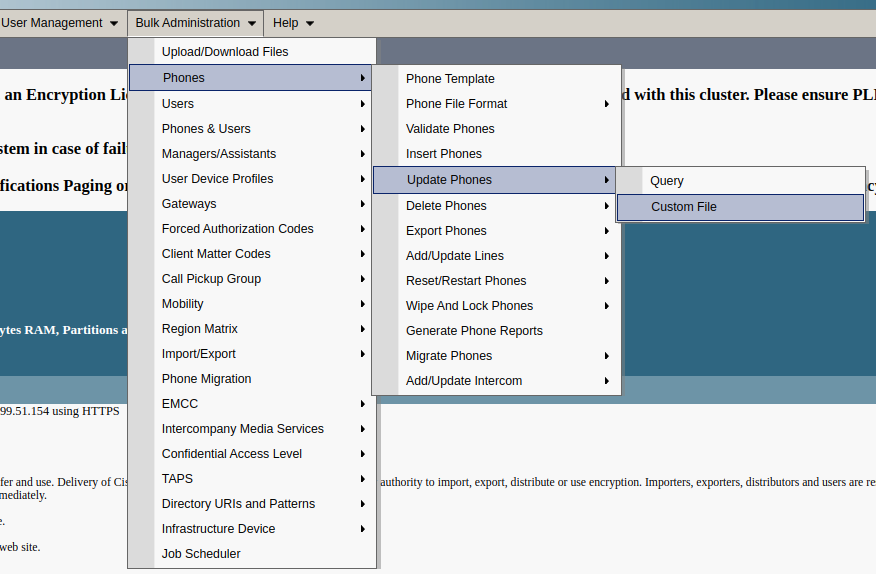
From Cisco Unified CM Administration, go to Bulk Administration -> Phones -> Update Phones -> Custom File
|
| Step 4 |
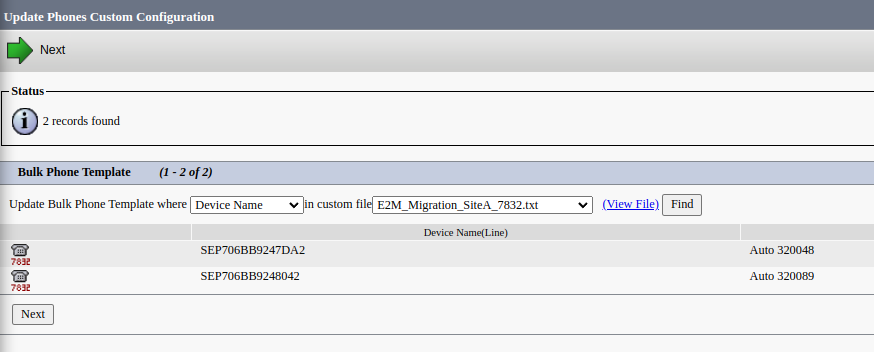
Use the custom files added in Step 2, find the devices to be migrated
|
| Step 5 | Click Next |
| Step 6 |
Select Apply Config

|
| Step 7 |
Configure Load Server to
cloudupgrader.webex.com

|
| Step 8 |
Configure Phone Load according to the table below:

|
| Step 9 | Scroll down and select Run Immediately |
| Step 10 | Click Submit |
| Step 11 | As soon as the job is completed, wait for all phones to upgrade. You can use RTMT for monitoring. |
| Step 12 | Proceed to the second upgrade and repeat Step 3 - 7. |
| Step 13 |
Set Peer Firmware Sharing to Disabled.

|
| Step 14 |
Configure Phone Load according to the table below:

|
| Step 15 | Wait for all phones to upgrade, the migration is complete and phones will run MPP firmware. |
Alternatively, you can host the firmware and licenses on CUCM. Please see UCM-based migration method for the detailed steps.
Introduction
Requirements
Make sure your phone is running the minimum enterprise firmware version as per the table below:
| Device Type | Firmware Version |
|---|---|
| 7811/7821/7841/7861 | 10-3-1-12 |
| 7832 | 12-5-1-16 |
| 8811/8841/8851/8861 | 10-3-1-20 |
| 8832 | 12-0-1-12 |
| 8845/65 | 10-3-2-16 |
Please note that the CUCM-registered phones will not work with this method if a trust list file(ITL/CTL) is installed.
In order to verify that, press the Applications button
The following screenshot shows the ITL file is installed:
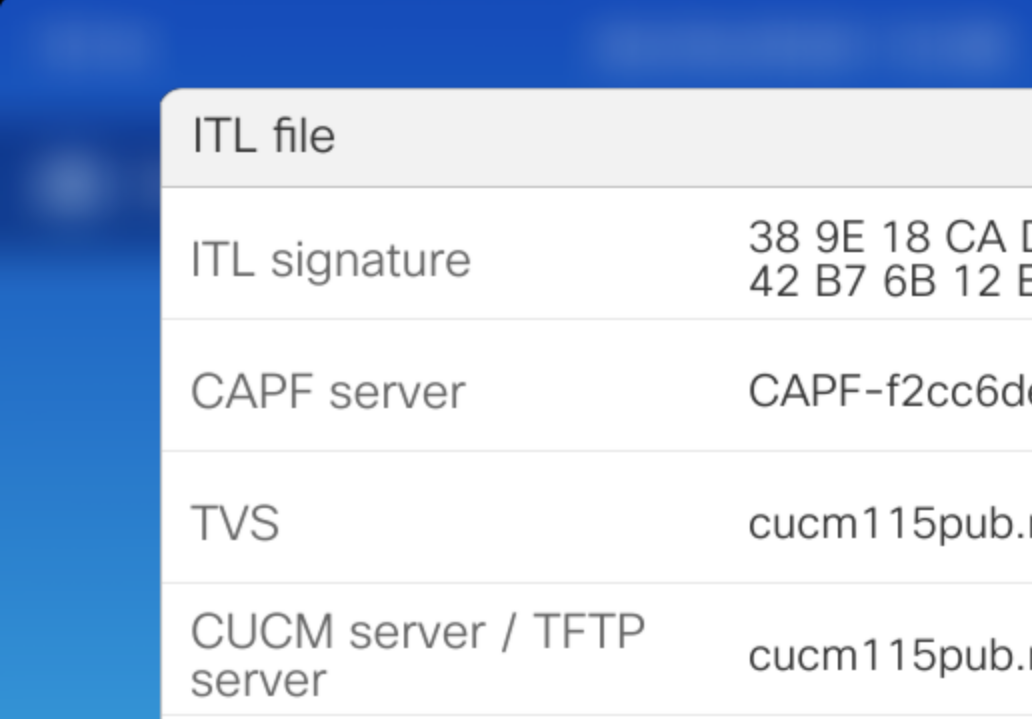
The trust list files can be removed from Admin Settings -> Reset Settings -> Security Settings
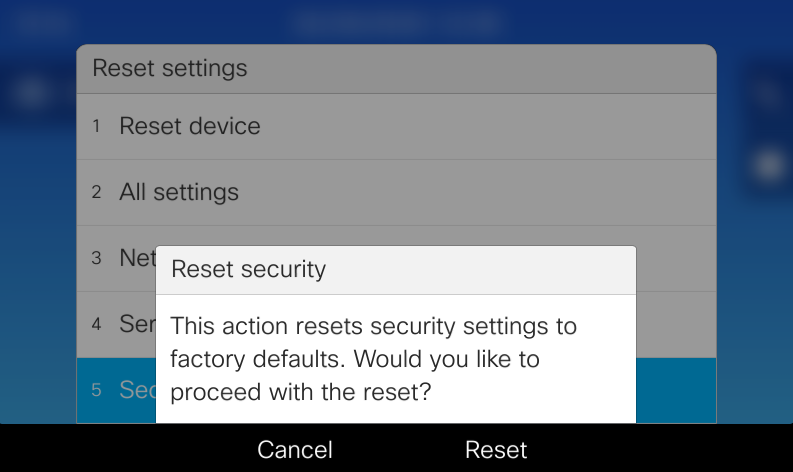
Please see CUCM Security By Default and ITL Operation and Troubleshooting
for more details.
Steps
- Configure the phones in Webex Control Hub to register them immediately after the migration process is completed.
- Configure the DHCP Option 150 to 3.14.211.49; or alternatively, if the DHCP Option 150 is not used, configure the DHCP Option 66 to cloudupgrader.webex.com
- Configure the DHCP Option 160 to https://cloudupgrader.webex.com/Cisco/EDOS/$PN/$MA.cfg
- You may need to reboot the phones to pick up the DHCP configuration.
- Wait for the phones to download the config and upgrade/restart several times.
- As soon as the migration process is completed, the phones should register to Webex Calling. You may need to reboot the phones or wait to resync the config if you add them in Webex Control Hub after the migration.
Introduction
Requirements
This method is appropriate for the lab/PoC environment or several phones only. We recommend to use other methods in the production environment for better scalability. The static IP address may change at any time.Make sure your phone is running the minimum enterprise firmware version as per the table below:
| Device Type | Firmware Version |
|---|---|
| 7811/7821/7841/7861 | 10-3-1-12 |
| 7832 | 12-5-1-16 |
| 8811/8841/8851/8861 | 10-3-1-20 |
| 8832 | 12-0-1-12 |
| 8845/65 | 10-3-2-16 |
Steps
- Press the Applications button
 and select Admin Settings -> Network/Ethernet Setup -> IPv4 Setup.
 - Set Alternate TFTP to On/Yes and configure TFTP Server 1 to 3.14.211.49.
- Select Apply.
- Select Erase when prompted that a Trust List is installed on the phone.
- Wait for the phone to download the config and upgrade/restart several times.
- As soon as the migration process is completed, the phone will prompt for an activation code which you can generate in Webex Control Hub.
Troubleshooting
Migration assistant tool is completed with errors for Webex calling migration.
Some of the error messages are self-explanatory, while others might need to involve TAC's support. Below are some examples:
- "Mac Address is already in use".
This device had been used by an org. Need to delete from there then redo the process.
- "Unable to get user details from CI due to user in different org".
Use a right user in the org.
- "POST failed: HTTP/1.1 502 Bad Gateway (url = https://csdm-r.wbx2.com/csdm/api...".
One of reasons is that this device had been provisioned before. Find the device and delete then redo the process.
The migration is successful, but phone does not register with Webex Calling, instead shows the activation code input box with message "Provide the migration license"
The followings are typical reasons:
- the migration license is missing. Please run the migration assistant tool for your device. Refer to Migration licenses.
- the license is present but the content is invalid. If you used migration assistant tool, please contact the customer support.
[Enterprise Phone Status Messages] "TFTP Timeout"
The phone is unable to connect to Cloud Upgrader or download the correct firmware version. In case of "Bulk migration with CUCM", verify "Phone Load". Make sure that the network and firewall requirements are fulfilled.
[Enterprise Phone Status Messages] "Upgrade Rejected: HW compat failure."
This error means that the current hardware version is not eligible for migrations. See this guide for more details.